Beyond Webpack: esbuild, Vite, Rollup, SWC and Snowpack
Analyzing, Comparing, and Selecting
Introduction
What is this about?
At ekino-France, we have conducted a thorough analysis, comparing webpack with various other bundlers, compilers, and tools currently available in the market. The primary objective of this comprehensive study is to determine whether it would be beneficial for us to transition away from webpack or if it would be more advantageous to continue using it.
In the course of this investigation, we will be putting webpack to the test and evaluating it on several key parameters. These include the Developer Experience (DX), the range of options and configurations it provides, and the size of the output bundle it generates.
At the end, we will be able to make an informed decision on whether to keep using webpack or consider switching to another tool that may better suit our needs.
Webpack in review
In webpack, there are many interesting features that I hope to keep or enhance. Among them, we can find:
- Declarative configuration.
- Extensibility (loaders and plugins).
- Hot Module Replacement (HMR).
- Code Splitting.
- Tree shaking.
- Minification (TerserPlugin).
- Module federation.
Nonetheless, like any technology, there are always some drawbacks. In webpack, the major drawback is the build time (DEV or PROD) for large projects.
Then, if the application uses non-standard configuration, it will be difficult to maintain and follow webpack’s updates without regressions.
At this level, I can give the example of migrating from Webpack 4 to webpack 5 with the removal of default polyfills for node.js core modules and the default support for old browsers (IE11).
Doing such a migration is not an obvious or simple task.
It requires an advanced level where one should master the impact of each change and break-change.
These drawbacks motivate me to look outside the box and start a deep study to challenge the capabilities of webpack.
In this study, I selected the most successful alternatives to webpack: esbuild, Vite, Rollup, SWC and Snowpack.
The primary focus of the study will be on:
- The core concepts.
- Incremental builds, caches, HMR, build time, and overall developer experience (development mode).
- Browser compatibility, output size, and available optimizations (production mode).
POC application
The POC application repository is available on GitHub.
The following is the webpack version of the application.
The execution performances are as follows:


Let’s see if the webpack alternatives can do better. 🎌
It’s time to move forward. Below is the menu I suggest:
· esbuild
∘ Core concepts
∘ Development mode
∘ Production mode
∘ Review and summary
· Rollup
∘ Core concepts
∘ Development mode
∘ Production mode
∘ Review and summary
· Vite
∘ Core concepts
∘ Review and summary
· SWC
∘ Core concepts
∘ Development mode
∘ Production mode
∘ Review and summary
· Snowpack
· Summary
· Conclusion
If you’re motivated, join me on this journey! 🚀
esbuild
Core concepts
The first thing that is intriguing is that esbuild is still a beta product. The actual version is 0.21.1. This is a bit worrisome since options or configurations may break or change between versions.
✳️ The internal working of esbuild is as follows:
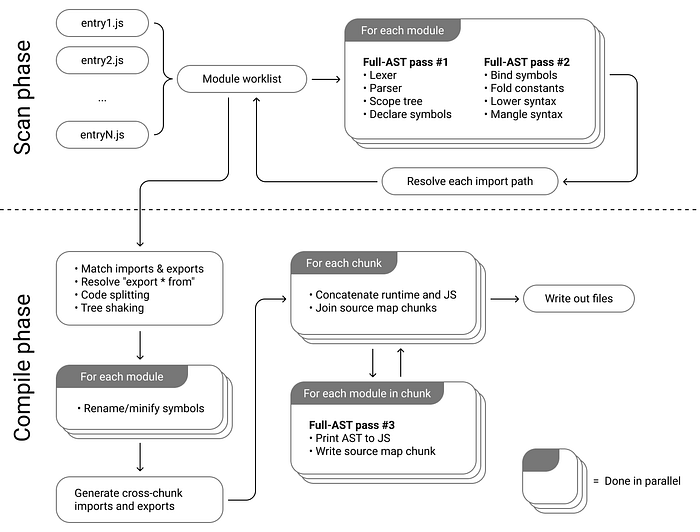
Two major stages are the scan phase and the compile phase. Both of these are implemented in bundler.go.
We can notice that most of the work is done in parallel.
1️⃣ The scan phase’s working details are as follows:
- In the scan phase of esbuild’s architecture, the main task is to find all the files necessary for the bundle.
- The process begins with the entry points specified by the user.
import * as esbuild from 'esbuild'

await esbuild.build({
  entryPoints: ['app.jsx'],
  bundle: true,
  outfile: 'out.js',
})esbuildthen scans these files to identify any import or require statements, recursively continuing this process for each discovered dependency.- This phase is highly optimized for speed and is performed in parallel to efficiently handle large numbers of files and dependencies.
- This phase is crucial for setting up the graph of module connections that will later be used in the bundling process.
2️⃣ Here’s an overview of the main steps in the compile phase:
- It processes each file identified in the scan phase.
- Parses JavaScript into an Abstract Syntax Tree (AST) for minification, tree-shaking, and syntax compatibility.
- Resolves imports and exports between modules for proper linkage and dependency management.
- The linker optimizes application performance by including only necessary modules (Tree-shaking), reducing bundle size (Minification), and handling circular dependencies and dynamic imports.
- Manages code transformations, like transpiling newer JavaScript to older versions.
- The goal is to produce an optimized final JavaScript bundle for execution.
For more detailed insights, you can refer to the esbuild documentation here.
✳️ esbuild uses plugins to extend the build system, similar to webpack. They allow for custom handling of specific tasks that aren’t covered by esbuild’s core features. For example, plugins can be used to:
- Load files of non-standard formats or preprocess files.
- Implement custom loading or resolving logic for modules.
- Integrate additional build steps like image optimization or CSS preprocessing.
- Modify the build output in specific ways that are not supported natively by
esbuild.
As an example, we might want to load CSS files that are not natively supported. We can use a plugin for that:
const esbuild = require('esbuild');
// Example plugin to handle CSS files
const cssLoaderPlugin = {
name: 'css-loader',
setup(build) {
build.onLoad({ filter: /\.css$/ }, async (args) => {
const contents = await require('fs').promises.readFile(args.path, 'utf8');
return {
contents: `const style = document.createElement('style');
style.innerText = ${JSON.stringify(contents)};
document.head.appendChild(style);`,
loader: 'js', // Treat the output as JavaScript
};
});
},
};
// Configuring ESBuild with the plugin
esbuild.build({
entryPoints: ['app.js'],
bundle: true,
outfile: 'out.js',
plugins: [cssLoaderPlugin],
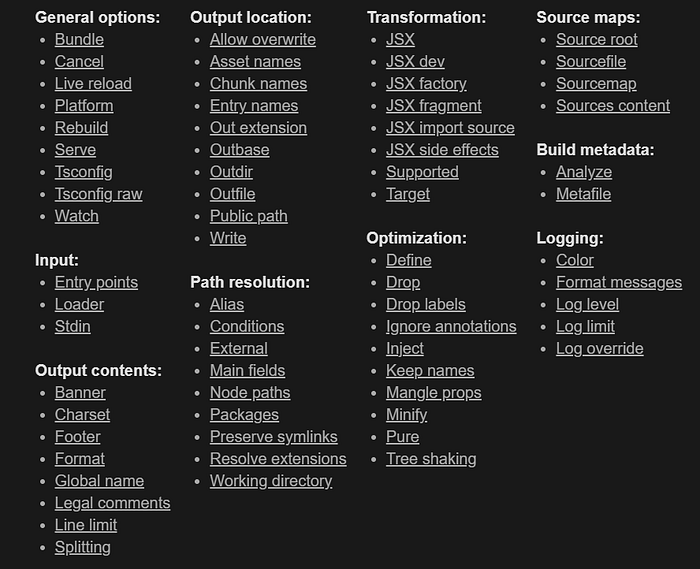
}).catch(() => process.exit(1));✳️ esbuild provides a wide array of configuration options that allow for extensive customization of the build process. These options cover general settings, input and output configurations, path resolutions, transformations, optimizations, and even handling of source maps and build metadata.
✳️ The question now is why is esbuild so fast? The detailed response can be found here. For now, here is a summary of the main reasons:
- It is written in Go, allowing for native code execution and efficient memory use.
- It uses parallelism, distributing parsing and code generation tasks across all available CPU cores.
- The architecture minimizes the number of passes needed and maintains a consistent data structure, enhancing processing speed.
The following are various benchmarks:
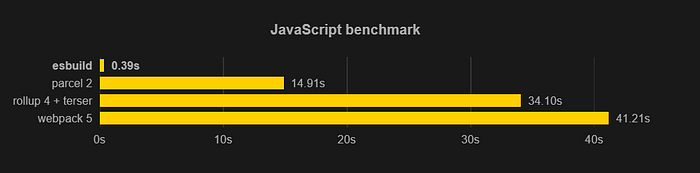

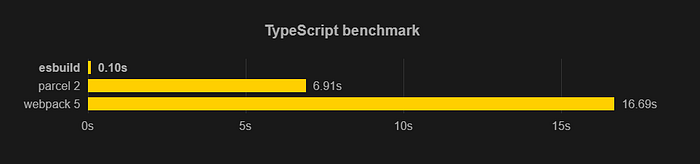
Theoretically, esbuild is very fast. Now it’s time to put it into practice.
Development mode
Here, you will find the source code for the React-esbuild application.
Here, you can find the configuration for esbuild.
The scripts required to start and build the application are as follows:
"scripts": {
  "dev": "concurrently -k -n 'build' -c 'auto' 'npm start' 'npm:watch:*'",
  "start": "node esbuild.config.js --start",
  "build": "node esbuild.config.js --build",
  ...
},
The dev script will start the application and any watch scripts at the same time. The watch script can be found in the ESBuild configuration:
// If the '--start' argument is passed in, start the application
if (args.includes('--start')) {
    esbuild
        .context({
            ...config, // Use the defined configuration
            minify: false, // Don't minify the code
            sourcemap: true, // Generate a source map
        })
        .then(async (ctx) => {
            // Watch the files for changes
            await ctx.watch();

            ...
        })
        .catch((e) => {
            // If there's an error, log it and exit the process with a status of 1
            console.error(e);
            process.exit(1);
        });
}
Enabling watch mode tells esbuild to listen for changes on the file system and to automatically rebuild whenever a file changes that could invalidate the build. — https://esbuild.github.io/api/#watch
A very important point to note about the watch mode is that it uses a heuristic approach to detect file changes.
esbuild’s watch mode uses a polling mechanism, which is more portable than OS-specific file system APIs. This system is designed to be CPU-efficient, as it doesn’t scan the entire directory tree in one go, but rather checks a random subset of files during each scan.
This means that file changes are detected shortly after they occur, but not immediately.
When a change is detected, the file path is included in a list of recently changed paths that are checked every time a scan occurs. This enables the system to detect any changes made to these files almost instantly.
In other words, the performance of the watch mode in ESBuild does indeed depend on what files are changed. If we modify files that have many dependencies, the build system can quickly recompile only the affected parts, leading to a faster build.
However, if we change parts of the code that are unrelated to the current module being watched, the system will need more time to identify and compile those changes. This is because it needs to scan through other files that might not be in the immediate subset being watched. So, the nature of the changes we make can significantly impact the build time.
ESBuild maintains a dependency tree that maps out the relationships between different modules in the codebase. When a file changes, ESBuild uses this dependency tree to determine which other files could potentially be affected by this change.
This allows ESBuild to intelligently and efficiently decide which parts of the code need to be recompiled, instead of having to recompile everything. This is part of what makes esbuild’s watch mode so fast and efficient. It’s a smart way to minimize unnecessary work and improve build performance.
Heuristic algorithms are used to make decisions based on the current state of the system and a set of rules or patterns. They don’t guarantee the best or optimal solution but provide a good enough solution in a reasonable time, which is often crucial in real-time systems.
Thus, the watch mode ensures a more expeditious reload (HMR). The speed of this reload can vary based on the size of the project and the nature of the changes, as we discussed earlier.
All builds done with a given context share the same build options, and subsequent builds are done incrementally (i.e. they reuse some work from previous builds to improve performance). — https://esbuild.github.io/api/#build
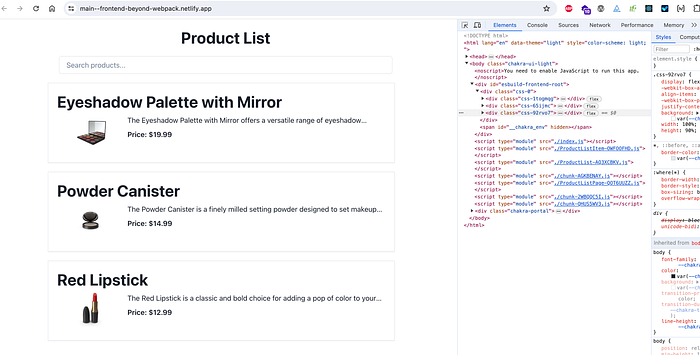
It was a delightful experience for me to get the application up and running smoothly (including html, js, jsx, and css) with esbuild’s straightforward and almost declarative setup. This was a refreshing change from webpack, where I had to hunt for various types of loaders, and then install and configure them. This ease of use is definitely another feather in esbuild’s cap.

esbuild Application (Image by the author)📍 It is important to note that the React code for the application is identical to the code for webpack.
Let’s move on to production mode. 🌟
Production mode
By default, if we do not activate the splitting option, the bundle will be a single file even if in the application I used lazy routes and lazy components. Which is a bit different from webpack:
esbuild bundle in production mode (Image by the author)It’s also important to mention that splitting option is still a work in progress and currently only works with the ESM output format.
The browser’s compatibility with ESM is as follows:

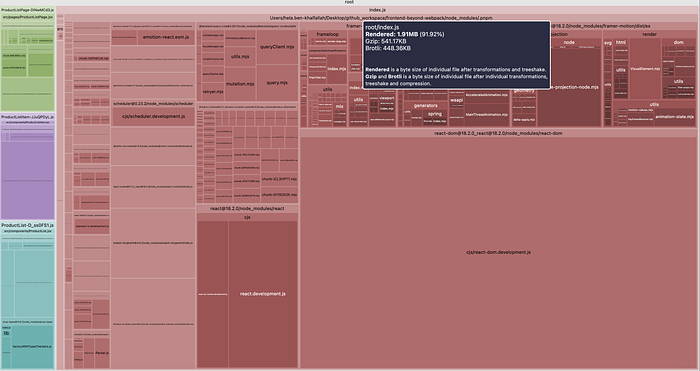
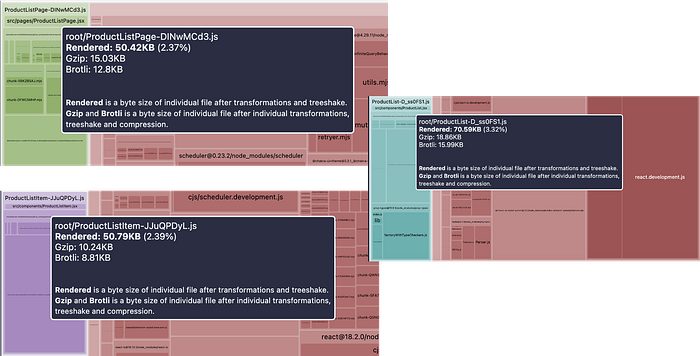
Analyzing the generated bundle is also possible with esbuild’s capabilities:
The analysis result without the splitting option is as follows:

The analysis result with the splitting option is as follows:

esbuild bundle in production mode with splitting option (Image by the author)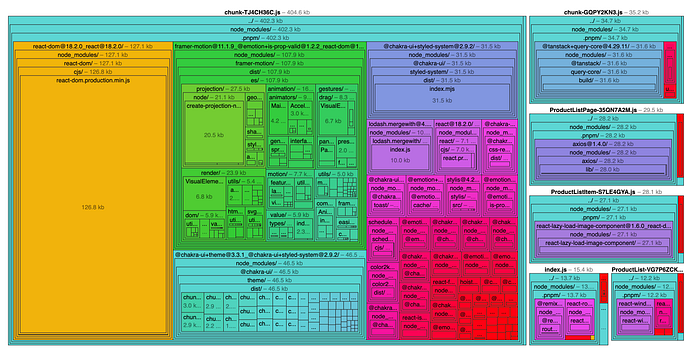
I recall the bundle and chunk sizes with webpack:
The sizes generated with (webpack + brotli) are better than those generated with esbuild at this level. Let’s see if we can enhance esbuild further.
In order to add new capabilities to esbuild, as in webpack, we must extends the plugins. Several plugins created by the community are also available. I will try to utilize esbuild-plugin-compress in my case.
// Importing required modules
import fs from 'fs';
import process from 'node:process'; // The process object is a global that provides information about, and control over, the current Node.js process.
import esbuild from 'esbuild'; // esbuild is a JavaScript bundler and minifier. It packages up JavaScript and TypeScript code for distribution on the web.
import { compress } from 'esbuild-plugin-compress';
// Get the command line arguments
const args = process.argv;
// Define the configuration for esbuild
const config = {
logLevel: 'info', // The level of logging to use
entryPoints: ['src/index.js'], // The entry point of the application
bundle: true, // Whether to bundle the code or not
loader: { '.js': 'jsx' }, // The loader to use for JavaScript files
};
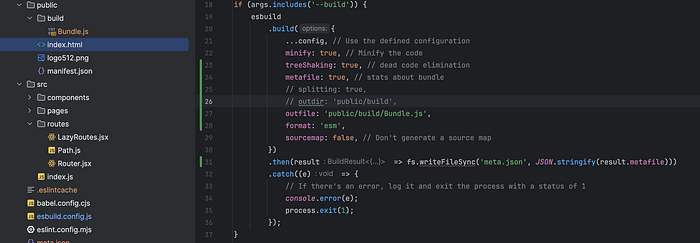
// If the '--build' argument is passed in, build the application
if (args.includes('--build')) {
esbuild
.build({
...config, // Use the defined configuration
sourcemap: false, // Don't generate a source map
minify: true, // Minify the code
treeShaking: true, // dead code elimination
metafile: true, // stats about bundle
splitting: true, // create chunks
format: 'esm',
outdir: 'public/build',
write: false,
plugins: [
compress({
outputDir: '.',
exclude: ['**/*.map'],
}),
],
})
.then(result => fs.writeFileSync('meta.json', JSON.stringify(result.metafile)))
.catch((e) => {
// If there's an error, log it and exit the process with a status of 1
console.error(e);
process.exit(1);
});
}
....Let’s examine the bundle again (the online tool and analyzeMetafile do not consider compression):

The result with compression is slightly better than the webpack version.
The required time for build is:
⚡ Done in 289ms // esbuild
webpack 5.84.1 compiled with 2 warnings in 3365 ms (3,3365 s) // webpack
It is clear that esbuild is considerably faster than the webpack, the time being almost divided by ten!
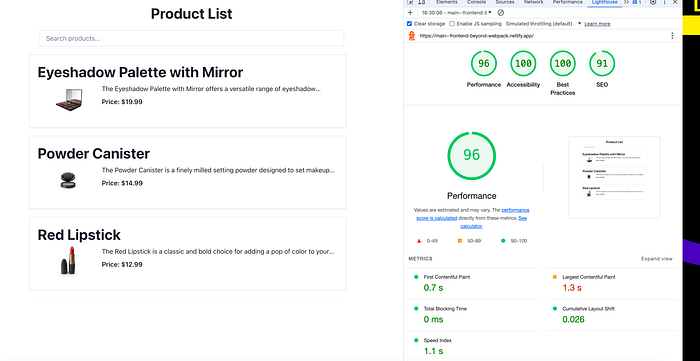
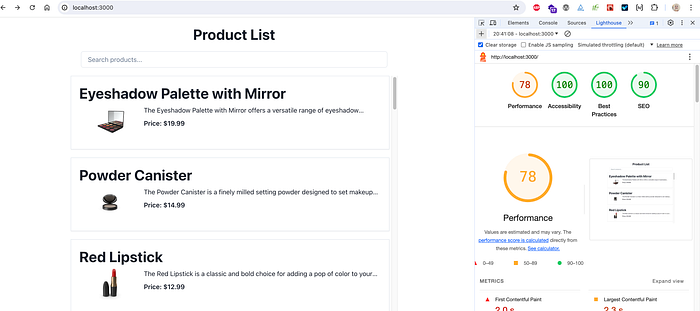
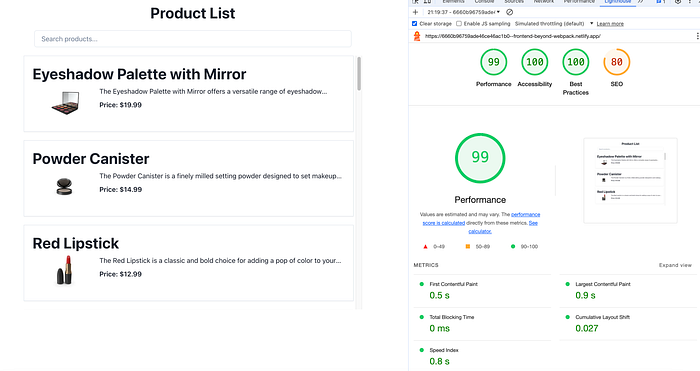
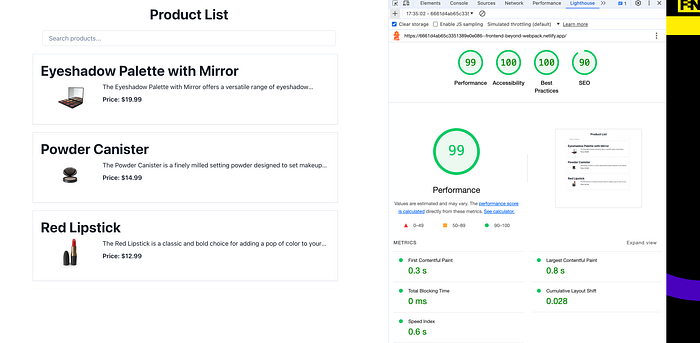
Let’s proceed to the lighthouse analysis now:

esbuild (Image by the author)For the same application and environment (local), webpack’s performance is better:
In my quest to transition to a different environment apart from the local one, I stumbled upon a challenge. I was searching for a counterpart to the HtmlWebpackPlugin from webpack. This plugin facilitates the initiation of an HTML page and the injection of the main bundle along with various chunks. However, it appears that this functionality is not available with esbuild, and there are open issues addressing this requirement:
- https://github.com/evanw/esbuild/issues/96
- https://github.com/evanw/esbuild/issues/31
- https://github.com/evanw/esbuild/issues/1995

Regrettably, there are currently no plans to incorporate this feature. I do not agree very much with the proposed solution, so I tinkered with my own solution and the interesting parts are:
...
// Function to copy assets
const copyAssets = (outputFiles, mode) => {
// If the mode is 'development' and the 'dist' directory exists, remove it
if(mode === 'development' && fs.existsSync('dist')) {
fs.rmSync('dist', { recursive: true, force: true });
}
// Define the path of the output HTML file
const outputHtmlFile = './dist/index.html';
// Copy the 'public' directory to the 'dist' directory
fs.cpSync('./public', './dist', {recursive: true});
// Generate the script tags for the output files
const outputScripts = outputFiles
.map(chunk => ` <script type="module" src="./${path.basename(chunk.path)}"></script>`)
.join('\n');
// Read the content of the output HTML file
const htmlNewContent = fs
.readFileSync(outputHtmlFile, { encoding: 'utf8', flag: 'r' })
.replace('</body>', `${outputScripts}\n</body>`); // Replace the '</body>' tag with the script tags and the '</body>' tag
// Write the new content to the output HTML file
fs.writeFileSync(outputHtmlFile, htmlNewContent);
};
// If the '--build' argument is passed in, build the application
if (args.includes('--build')) {
...
.then(result => {
// After the build, copy the assets
copyAssets(result.outputFiles, 'production');
// Write the metafile to disk
fs.writeFileSync('meta.json', JSON.stringify(result.metafile));
})
.catch((e) => {
// If there's an error, log it and exit the process with a status of 1
console.error(e);
process.exit(1);
});
}
// If the '--start' argument is passed in, start the application
if (args.includes('--start')) {
...
.then(async (ctx) => {
// After the context is created, copy the assets
copyAssets(
[
{
path: 'Bundle.js' // Define the path of the bundle
}
],
'development');
// Watch the files for changes
await ctx.watch();
...
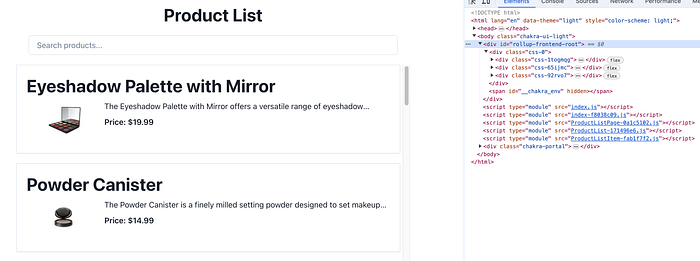
}And the magic output is like this:
// index.html
<!DOCTYPE html>
<html lang="en">
  <head>
    <meta charset="utf-8" />
    <link rel="icon" href="logo512.png" />
    <meta name="viewport" content="width=device-width, initial-scale=1" />
    <meta name="description" content="Next generation Store (React)" />
    <title>Next generation Store (React)</title>
  </head>
  <body>
    <noscript>You need to enable JavaScript to run this app.</noscript>
    <div id="esbuild-frontend-root"></div>
    <script type="module" src="./index.js"></script>
    <script type="module" src="./ProductListItem-S7LE4GYA.js"></script>
    <script type="module" src="./ProductList-VG7P6ZCK.js"></script>
    <script type="module" src="./chunk-6GBVFD7D.js"></script>
    <script type="module" src="./ProductListPage-35QN7A2M.js"></script>
    <script type="module" src="./chunk-GQPY2KN3.js"></script>
    <script type="module" src="./chunk-TJ4CH36C.js"></script>
</body>
</html>
Let’s attempt to deploy this application in Netlify:
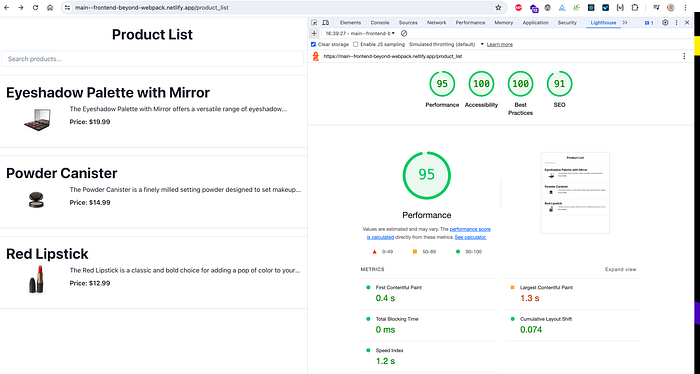
Yes, it’s working! Let’s inspect the performance now:
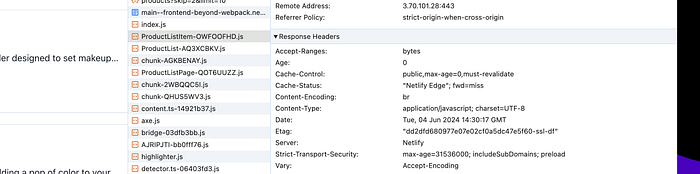
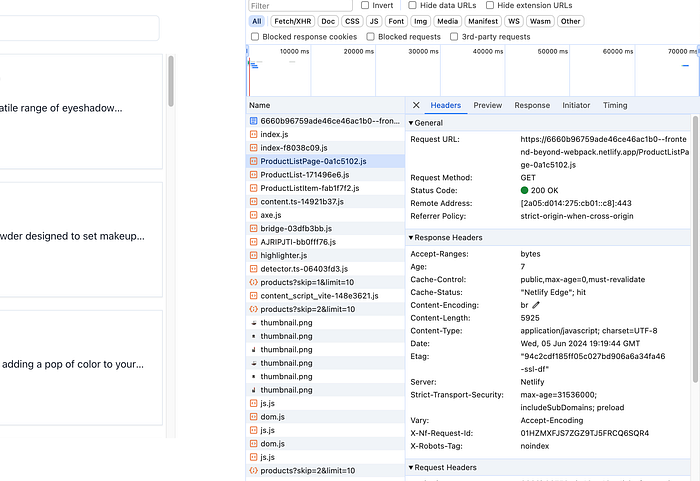
And also the compression works well. We can see below that Netlify serves Brotli:
And the webpack version:
It’s also Brotli served:
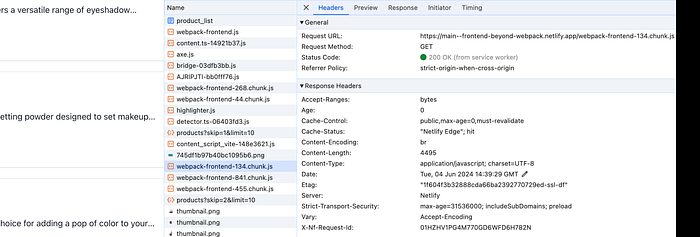
We can see that the performances are very close, almost identical.
All of the optimization options I enabled in esbuild are:
minify: true, // Minify the code
treeShaking: true, // dead code elimination
splitting: true, // create chunks
format: 'esm',
More information can be found here.
A final comment on the features that are not included in the roadmap (may be never):
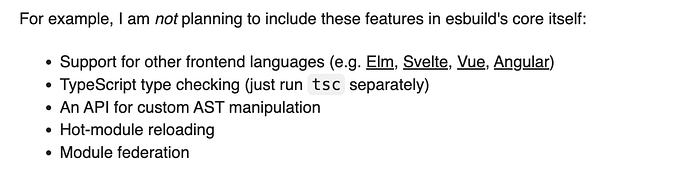
It’s time to wrap it up!
Review and summary
🔵 Positive Aspects:
- Fast build and launch time is a major benefit of
esbuild. The developer experience can greatly benefit from its speed, particularly in larger projects. - Simple and declarative configuration can make it easier for developers to understand and modify the build process, which is especially beneficial for teams and projects that need a high level of flexibility.
🔴 Worrisome Aspects:
- The
HtmlWebpackPluginis widely used in thewebpackecosystem to generate HTML files that servewebpackbundles. However, it is not available inesbuild. - esbuild’s loaders and plugins are limited compared to webpack’s. While it covers most common use cases, the absence of certain capabilities (like module federation) might limit its use in certain scenarios.
The creator of esbuild has indeed focused on keeping the tool lean and efficient, which means it might not have all the features that other, more complex tools, such as webpack, offer.
This design philosophy has its pros and cons. On the positive side, it allows esbuild to be fast, lightweight, and easy to use, which can be a big advantage for simple projects. On the other hand, it might limit the tool’s flexibility and adaptability for more complex needs.
💡 In the end, the most suitable tool relies on the specific requirements of the project. If we need a tool with a wide range of features and extensive configuration options, then a more feature-rich tool like webpack might be a better choice. If we prioritize speed, simplicity, and ease of use, esbuild could be a great fit. It’s all about finding the right balance for our specific needs.
Fasten your seatbelts, we will go to another planet called Rollup! 🌎
Rollup
Core concepts
Here’s a simplified explanation of how Rollup works:
*While browsing the Internet, I did not find a schematic describing the internal functioning of Rollup. Therefore, I analyzed its source code and provided all the steps to chatgpt to generate this schema.
1️⃣ Since Rollup version 4, Rollup has switched its parser from Acorn to SWC. SWC is written in Rust, offering superior performance. To interact with the Rust code, Rollup uses napi-rs for Node.js and wasm-bindgen for browser builds.
2️⃣ The process starts with the provision of a configuration file or command-line options:
import { rollup } from 'rollup';

async function build(inputOptions, outputOptions) {
  const bundle = await rollup(inputOptions);
  await bundle.write(outputOptions);
}

const inputOptions = {
  input: 'src/main.js',
  plugins: [
    // Your plugins here
  ]
};

const outputOptions = {
  file: 'dist/bundle.js',
  format: 'iife',
  name: 'MyBundle'
};

build(inputOptions, outputOptions);
3️⃣ When rollup(inputOptions) is executed, it initiates the entire build process by following these key steps.
✔️ initWasm() is called to initialize any WebAssembly modules required for the build. This step ensures that any WebAssembly functionality needed by Rollup or its plugins is ready to be used.
✔️ A Graph object is instantiated, representing the module graph that Rollup will use to manage dependencies and perform the build process. This graph handles the complex relationships between different modules and ensures that they are correctly bundled.
✔️ The graph.build() method is called to execute the actual build process. During this process, Rollup resolves each module’s dependencies and performs several key actions for each module:
- Module Loading: Modules are loaded from the filesystem or other sources.
- Module Parsing (
SWC): The source code of each module is parsed into an AST usingSWC. - AST Transformation: The AST is transformed using various plugins. These plugins can perform tasks such as transpiling code, optimizing code, and more.
- AST Analysis: Dependencies are analyzed and tracked.
- Tree-Shaking: Unused code is marked for removal by analyzing the AST.
- Code Generation: The final output code is generated by combining the transformed ASTs.
✔️ Create RollupBuild Result Object: After the build process completes, a RollupBuild result object is created. This object provides methods and properties for interacting with the build result, such as generating or writing the output bundles, closing the build, and accessing the list of watched files.
By following these steps, Rollup processes the input options, initializes necessary components, builds the module graph, performs tree-shaking to remove unused code, and generates the final output bundle. This streamlined approach ensures efficient and optimized JavaScript bundling, leveraging the power of SWC for fast parsing and transformation.
As the internal operation becomes more or less clear, it’s time to begin working on the code and starting with the development mode. Here we go!
Development mode
Initially, setting up Rollup for a React frontend app proved challenging as I navigated through numerous errors, sifted through various issues, and experimented with different configurations. Some valuable insights were hard to come by, especially considering the limited documentation on this particular topic.
This is the final configuration I have.
The scripts required to start and build the application are as follows:
  "scripts": {
    "start": "rollup -c",
    "build": "NODE_ENV=production rollup -c",
    "analyze": "NODE_ENV=analyze rollup -c"
    ...
  },
I found several useful plugins:
import serve from 'rollup-plugin-serve';
import livereload from 'rollup-plugin-livereload';
import html from '@rollup/plugin-html';rollup-plugin-serveandrollup-plugin-livereloadcome in handy for setting up a local development server with hot module reload (HMR) capability.rollup/plugin-htmlfunctions akin toHtmlWebpackPlugin, facilitating the injection of bundled assets and chunks into the served HTML index.
These plugins are particularly beneficial for developers looking to transition from webpack to Rollup.
Below is the result of the local launch:
📍 It is important to note that the React code for the application is identical to the code for webpack.
Let’s move on to production mode. 🌟
Production mode
Rollup has a bundle analyzer plugin called rollup-plugin-visualizer. This plugin generates an interactive treemap visualization of our bundle.
Rollup allows several formats the generated bundle: amd , cjs , es , iife , … For my case I used es:
output: {
    dir: 'dist', // Output directory for the bundle
    format: 'es', // ES module format: Keep the bundle as an ES module file
    name: 'FrontendRollupApp', // Global variable name for the bundle
    sourcemap: true // Generate sourcemap for debugging
},
I enabled gzip and brotli compression as well:
import { gzipPlugin } from 'rollup-plugin-gzip';
import { brotliCompressPlugin } from 'rollup-plugin-brotli';

export default {
  // Other Rollup configurations...

  plugins: [
    // Other plugins...
    gzipPlugin(),
    brotliCompressPlugin()
  ]
};
The required time for build is:
⚡ Done in 289ms // esbuild
webpack 5.84.1 compiled with 2 warnings in 3365 ms (3,3365 s) // webpack
created dist in 8.2s // Rollup
So far, Rollup has not had the best build time.
The bundle’s analysis result is as follows:
I recall the bundle and chunk sizes with webpack:
- One advantage is that Rollup automatically generates chunks for “lazy” loaded parts.
- The sizes generated with (
webpack + brotli) are better than those generated with (rollup + gzip) or (rollup + Brotli).
Let’s proceed with deploying and analyzing the execution results:
It’s also Brotli served:
✔️ The runtime performance of the Rollup version is slightly better than that of the webpack and esbuild versions.
✔️ The decrease in the SEO rate is due to an improvement that I need to make in HTML and meta descriptions, so don’t pay attention.
It’s time to wrap it up!
Review and summary
Rollup boasts several advantages alongside a few noteworthy limitations.
On the positive side, it excels in areas such as tree-shaking, support for ES modules, an expanding plugin ecosystem, and streamlined lazy loading capabilities.
However, it’s crucial to acknowledge its downsides. Rollup’s simplicity, while appealing, can sometimes restrict flexibility for more intricate build setups compared to alternatives like webpack. Moreover, newcomers to Rollup may face a learning curve, especially if they’re transitioning from other build systems.
I hope you found our visit to Rollup planet intriguing. Get ready for the next part of our journey as we set our course for another destination: the fascinating planet known as “Vite”! Secure your seatbelts for another thrilling adventure ahead! 🌎
Vite
Core concepts
Vite is a development server and build tool:
During development: Vite serves source code over native ESM (ES Modules). It only needs to transform and serve source code on demand, as the browser requests it. For this transformation process, Vite uses esbuild.
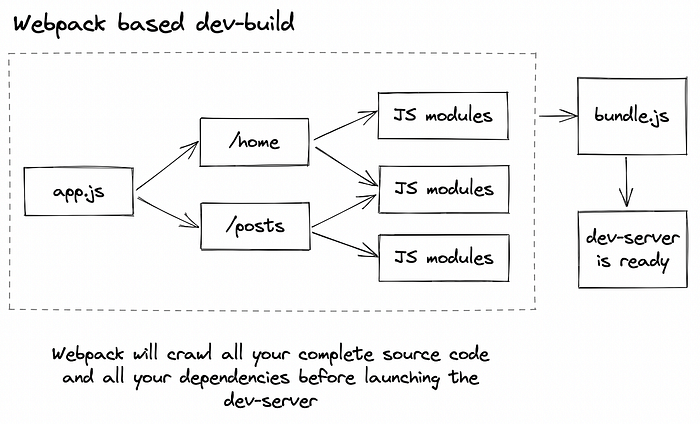
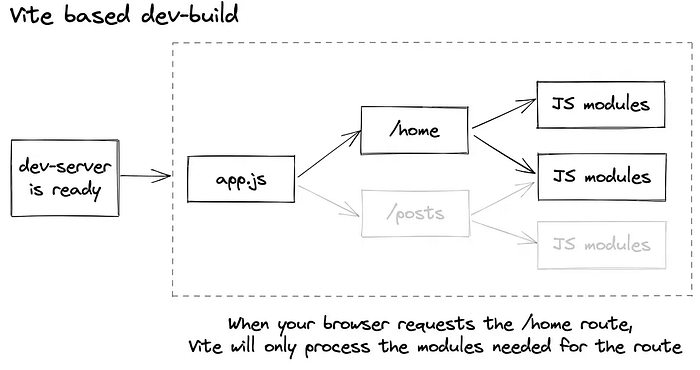
For pre-bundling dependencies: Vite pre-bundles dependencies using esbuild. esbuild, being written in Go, is significantly faster at this task than JavaScript-based bundlers.
During the build process: While esbuild is used for transpilation and minification, the actual bundling is handled by Rollup. This is because, as of now, esbuild’s bundling, especially for code splitting, is less stable/advanced compared to Rollup.
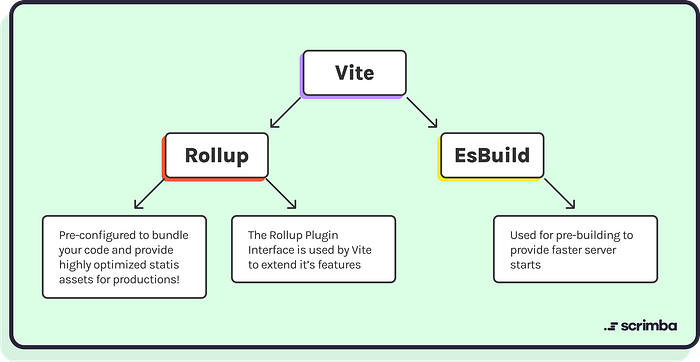
It’s a tool that sits on top of other tools and orchestrates them to provide a smooth and efficient development experience. It doesn’t act as a compiler or bundler by itself, but it incorporates such tools into its operational process.
This architecture allows Vite to be fast, lightweight, and versatile. It also makes it easy to plug in different tools as needed, providing a lot of flexibility for different project requirements.
More information can be found here and here.
Setting up Vite is like a breeze, whoa! You have only one thing to do:
pnpm create vite vite-app --template reactThen, like a magic, everything, including the necessary scripts, including ESLint, will be available for you!
Despite being neither a compiler nor a bundler, Vite has successfully chosen, organized, and optimized its work tools. 😍
Ten out of ten for developer experience! 💯
As we have already evaluated the performance of the tools (esbuild and Rollup), it is unnecessary to repeat the same exercise for ‘Vite’.
Let’s proceed with the review now ! 🚀
Review and summary
Here are some of the key pros and cons of my use of Vite.js:
1️⃣ Pros:
✔️ Easy to use and configure (good DX).
✔️ Instant Hot Module Replacement (HMR).
✔️ On-Demand Compilation.
✔️ Out-of-the-Box Support for Modern Features (ES Modules, TypeScript, JSX, and CSS).
✔️ Optimized production build thanks to Rollup.
✔️ Rich Plugin System again thanks to Rollup.
✔️ Support for Multiple Frameworks.
2️⃣ Cons:
✔️ Browser Compatibility: Vite’s development server relies on native ES module support, which means it only works in modern browsers. For older browsers, additional configuration and polyfills are required.
✔️ Different Paradigm: For developers used to traditional bundlers like webpack, Vite’s approach (serving unbundled modules during development) might require some adjustment.
Beyond its technical features, I appreciate how Vite.js encapsulates and abstracts the build process. As a developer, I have always favored abstracting tools to simplify updates and migrations. By defining clear inputs and outputs, I can freely choose how to implement the underlying core or kernel. In addition this approach aligns well with modern software engineering practices (Frontend Ops), promoting maintainability, flexibility, and ease of use.
It’s time to explore a new frontier and discover the magic powering Next.js: SWC, yay ! 🚀
SWC
Core concepts
Next.js now uses Rust-based compiler SWC to compile JavaScript/TypeScript. This new compiler is up to 17x faster than Babel when compiling individual files and up to 5x faster Fast Refresh. — https://nextjs.org/docs/messages/swc-disabled
A bit of theory: SWC is a JavaScript/TypeScript compiler built in Rust. It seeks to offer a high-performance alternative to existing JavaScript tools by utilizing Rust’s speed and safety. SWC is engineered to efficiently manage the heavy tasks of parsing, transforming, and compiling JavaScript and TypeScript code.
Whenever I encounter a compiler or bundler written in a native language like C, C++, or Rust, I think to myself: this is a promising approach!
Compilers or bundlers written in native languages offer several advantages in terms of performance, control, portability, safety, and community support, making them a promising choice for developers seeking to build efficient and reliable developer tools.
They allow to write code that can directly interact with system resources (without a virtual machine (VM)), optimize memory usage (without garbage collection), and execute quickly. This performance advantage translates well to compilers and bundlers, which often deal with large codebases and need to process files efficiently.
Well, let’s dig deeper into SWC now and here’s how it works:
+-------------------------+
|        JavaScript       |
|        / TypeScript     |
+-------------------------+
|
v
+-------------------------+
|     Syntax Parser       |
|         (Rust)          |
+-------------------------+
|
v
+-------------------------+
|      AST (Abstract      |
    |    Syntax Tree)     |
+-------------------------+
|
v
+-------------------------+
|    Transformer System   |
|         (Rust)          |
+-------------------------+
|
v
+-------------------------+
|       Code Generator    |
|         (Rust)          |
+-------------------------+
|
v
+-------------------------+
|       Optimized Code    |
+-------------------------+- The input to SWC is JavaScript or TypeScript code.
- The code is parsed by the Syntax Parser (Rust), which generates an Abstract Syntax Tree (AST).
- The AST is then processed by the Transformer System (Rust), which applies various transformations to the code (e.g., syntax transformations, optimizations).
- The transformed AST is passed to the Code Generator (Rust), which generates optimized JavaScript code.
- Finally, the output is the optimized code ready for execution or further processing.
SWC can be used as a replacement for Babel in many scenarios. Both SWC and Babel are JavaScript/TypeScript compilers that can transpile modern JavaScript and TypeScript code to backward-compatible versions for compatibility with older browsers or environments:
SWC’s compilation is intended to support all ECMAScript features. The SWC CLI is designed to be a drop-in replacement for Babel. SWC supports all stage 3 proposals, and preset-env, including bugfix transforms. — https://swc.rs/docs/migrating-from-babel
SWC can also replace the TypeScript Compiler (tsc) for compiling TypeScript code. SWC supports TypeScript syntax and can perform type checking and compilation of TypeScript code efficiently, making it a viable alternative to tsc. Additional information is available here.
Let’s talk about benchmarks and execution performance now:
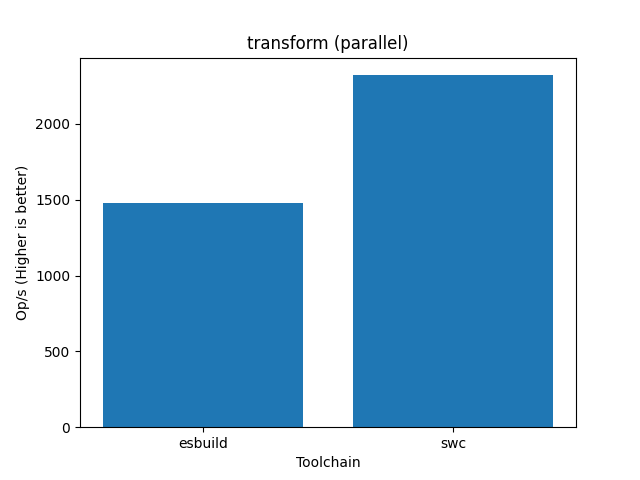
tsx is indentical for parallel and synchronous benchmarks.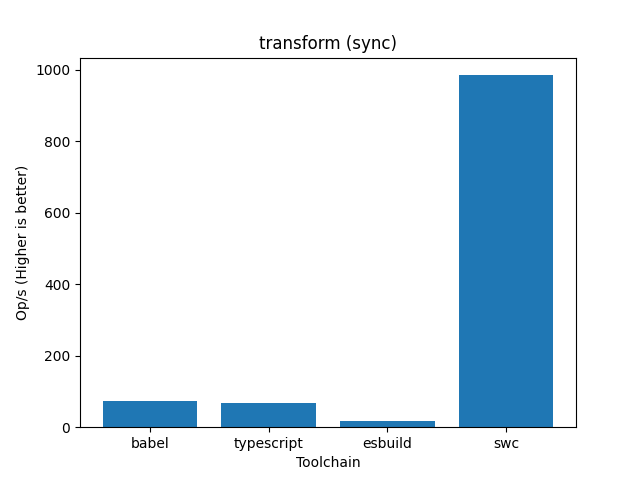
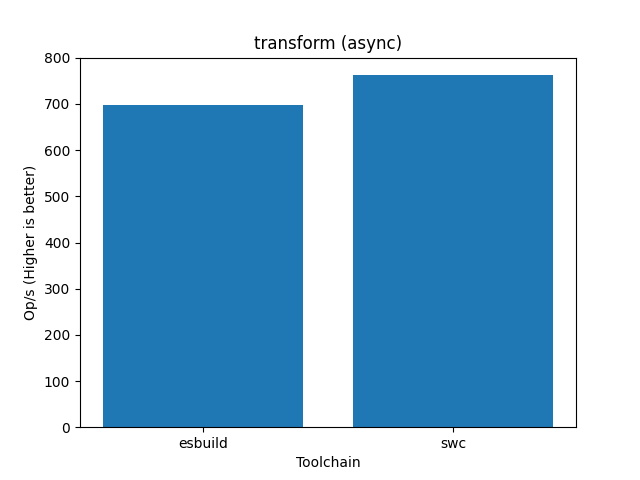
These benchmarks are used to evaluate the performance of SWC on every commit, as well as against other libraries like Babel or esbuild. — https://swc.rs/docs/benchmarks#es2020-2


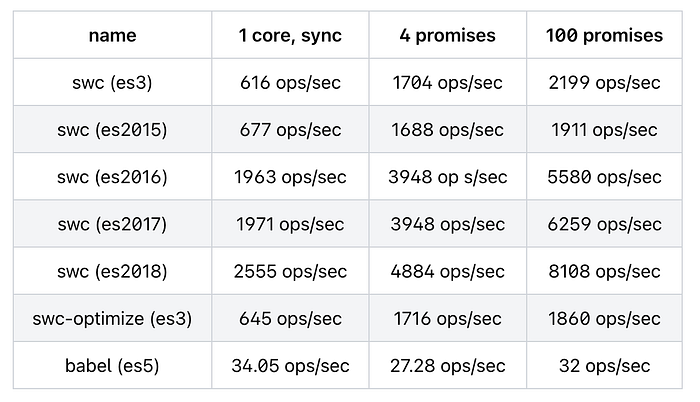
Across various benchmark scenarios, SWC consistently outperforms Babel in terms of overall compilation time. This includes parsing, transforming, and code generation stages!
I discovered another interesting benchmark: “Benchmarking esbuild, swc, tsc, and babel for React/JSX projects”. It’s interesting because at Ekino we use React along with other frameworks, and I would like to see the results in real life.
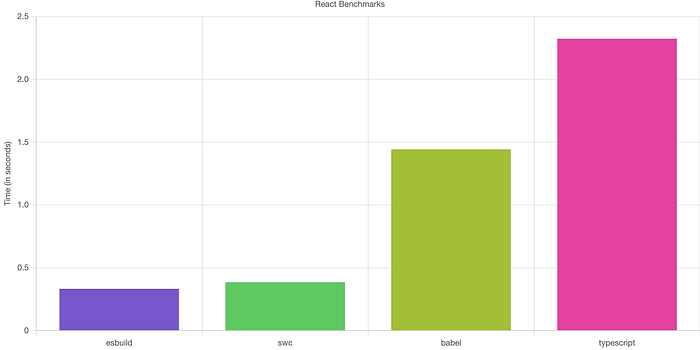
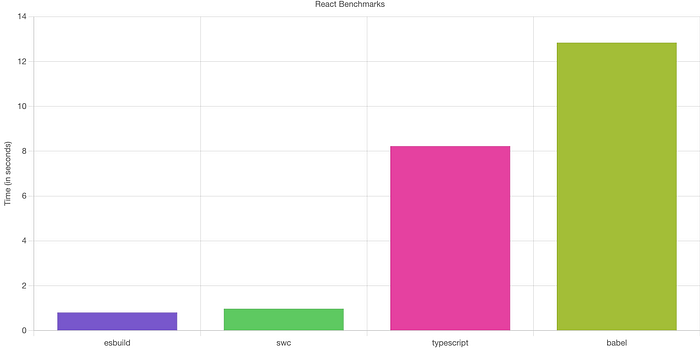
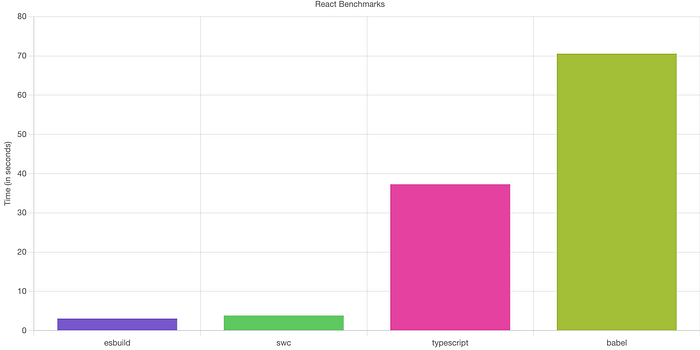
Babel and TypeScript both seem to do more source code validation than esbuild or swc does. esbuild seems to do best in all cases, followed by swc.
I believe we’ve covered enough theory. It’s time to dive into the code and start experimenting. 🚀
Development mode
SWC can be used for compiling JavaScript/TypeScript code, including support for ECMAScript modules (ESM):
- If we solely need compilation without bundling, SWC can be used directly in our build process without the need for extra bundlers.
- However, if we need to bundle our compiled code for deployment, we’ll typically use SWC in conjunction with a bundler like
webpackthrough swc-loader. The compiled output from SWC can be bundled into a single or multiple file by these bundlers for optimized delivery to the browser.
Next.js uses SWC, but still bundles with Webpack through
swc-loader, ornext-swc-loaderto be precise. — https://github.com/vercel/next.js/discussions/47672#discussioncomment-5474097
To streamline the formula:
Vite=Rollup+ESBuild (or swc)Next.js=Webpack+SWC
💡 For our case, I will use webpack as we already have the configuration.
🚩 Another important point to understand is that SWC focuses exclusively on compiling JavaScript and TypeScript. If your project involves other file types, such as CSS, HTML, JSON, SVG, or Markdown, you will need to use webpack or another bundler to handle these files. The bundler will optimize and adapt these additional file types for use in the browser.
You can find here the full development configuration. The most significant change I made is:
...

 module: {
  rules: [
     {
      test: /\.(js|jsx)$/,        // 1. Match JavaScript files
      exclude: /(node_modules)/, // 2. Exclude node_modules
      use: {
         loader: "swc-loader",    // 3. Use SWC loader for transformation
         options: {
          // Load the appropriate .swcrc file
          configFile: './.swcrc'
         }
     }
   },

...
And I add different .swrc configurations for production and development.
The outcome of execution in local is:
webpack 5.84.1 compiled successfully in 805 ms // first time

webpack 5.84.1 compiled successfully in 777 ms // second time
That’s a fantastic local outcome and DX!
Let’s proceed to production mode and deploy the application! 🎡
Production mode
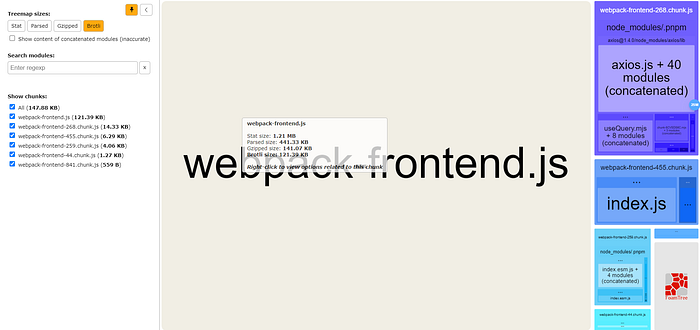
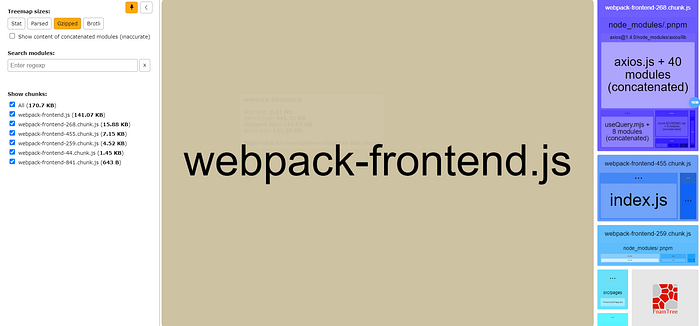
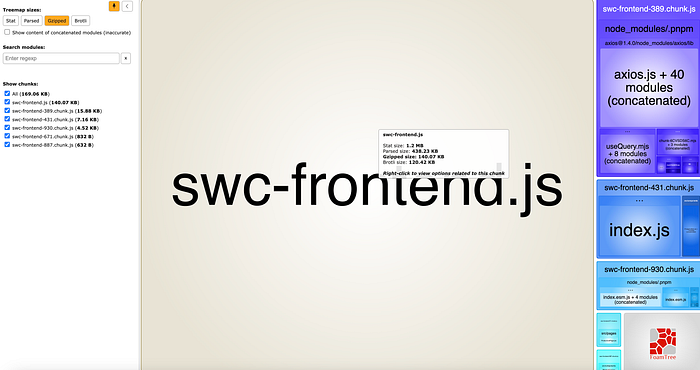
We’ll start by scanning the bundle:
I recall what we got with webpack only:
Or simply:
// webpack (gzip)
All (170.73 KB)
webpack-frontend.js (141.08 KB)
webpack-frontend-389.chunk.js (15.88 KB)
webpack-frontend-595.chunk.js (7.15 KB)
webpack-frontend-930.chunk.js (4.52 KB)
webpack-frontend-615.chunk.js (1.46 KB)
webpack-frontend-553.chunk.js (646 B)
// webpack(brotli)
All (147.87 KB)
webpack-frontend.js (121.38 KB)
webpack-frontend-389.chunk.js (14.32 KB)
webpack-frontend-595.chunk.js (6.3 KB)
webpack-frontend-930.chunk.js (4.05 KB)
webpack-frontend-615.chunk.js (1.26 KB)
webpack-frontend-553.chunk.js (562 B)
// webpack + swc (gzip)
All (169.06 KB)
swc-frontend.js (140.07 KB)
swc-frontend-389.chunk.js (15.88 KB)
swc-frontend-431.chunk.js (7.16 KB)
swc-frontend-930.chunk.js (4.52 KB)
swc-frontend-671.chunk.js (832 B)
swc-frontend-887.chunk.js (632 B)
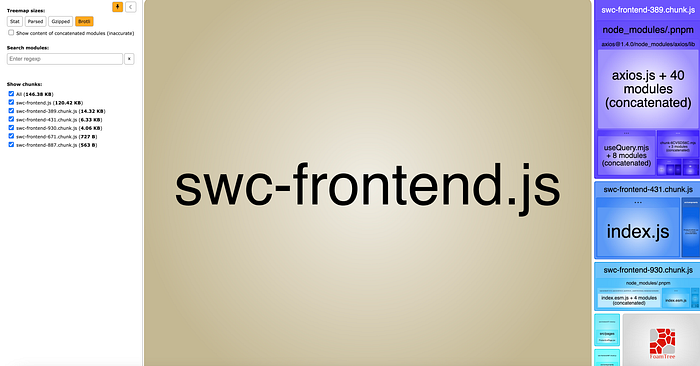
// webpack + swc (brotli)
All (146.38 KB)
swc-frontend.js (120.42 KB)
swc-frontend-389.chunk.js (14.32 KB)
swc-frontend-431.chunk.js (6.33 KB)
swc-frontend-930.chunk.js (4.06 KB)
swc-frontend-671.chunk.js (727 B)
swc-frontend-887.chunk.js (563 B)The outcomes are very close!
The required time for build is:
⚡ Done in 289ms // ESBuild
created dist in 8.2s // Rollup
webpack 5.84.1 compiled with 2 warnings in 3365 ms (3,3365 s) // webpack
webpack 5.84.1 compiled with 2 warnings in 3368 ms // webpack + SWC
Same, the outcomes (webpack and webpack + swc) are very close!
Let’s proceed with deploying and analyzing the execution results:
Rollup and (webpack + swc) results are both good. Cool!
Let’s proceed with the review now ! 🚀
Review and summary
Here are some of the key pros and cons of my use of SWC:
1️⃣ Pros:
✔️ Written in Rust, SWC is much faster compared to traditional compilers like Babel.
✔️ Supports the latest JavaScript and TypeScript features, ensuring compatibility with modern web development practices.
✔️ Can be easily integrated into existing workflows using tools like webpack (swc-loader) and Vite.
✔️ Produces highly optimized code “without tears” and with built-in minification capabilities, which are crucial for production deployments.
✔️ Smaller memory footprint compared to Node.js-based compilers like Babel.
2️⃣ Cons:
✔️ Compared to Babel, SWC’s ecosystem is still growing. Fewer plugins and less community support for niche use cases.
✔️ swc is primarily focused on JavaScript and TypeScript. For other assets (CSS, HTML, etc.), we still need other tools or loaders.
✔️ Being relatively new and under active development, there can be frequent updates and breaking changes.
But I’m not against using it behind a tool that abstracts updates, configuration, plug-ins, and upgrades, like Next or Vite.
Snowpack is our last planet to discover, so let’s begin! 🌎
Snowpack
Unfortunately, our trip with snow will end very early:

As of April 20, 2022, the Snowpack team announced that it is no longer actively maintained and not recommended for new projects. This decision reflects a shift in focus by the developers, influenced by the evolving web development ecosystem and the rise of new tools like Vite.
Now, let’s proceed to the overall summary and the strategic decisions we need to make at ekino-France to modernize, optimize, and enhance our build tools. 🚀
Summary
Here’s a summary comparing the various build tools and bundlers we discussed above: Webpack, esbuild, Rollup, SWC, Vite, and Snowpack.
Webpack: Best for large and complex applications with diverse needs and extensive control over the build process.esbuild: Ideal for projects where build speed is a priority, offering ultra-fastJavaScript/TypeScriptbundling and minification.Rollup: Excellent for modular builds with a focus on tree-shaking and optimized output, especially for libraries and projects usingESM.SWC: Highly efficient forJavaScript/TypeScripttransformation and compilation, often used in conjunction with other tools for full bundling capabilities.Vite: Combines fast development with modern JavaScript features, becoming a go-to tool for new web projects.Snowpack: Was great for fast ESM development and prototyping, but no longer recommended for new projects due to its deprecation.
In our final decision, we have chosen a strategic approach that leverages the strengths of Vite and Next.js to optimize performance and streamline development workflows.
Vite, powered by esbuild, offers unparalleled speed and efficiency, making it the ideal choice for projects that do not require server-side rendering. Its modern features, simplicity, and efficient bundle optimization provided by Rollup ensure a seamless development experience and good output (bundle size).
On the flip side, Next.js excels in server-side rendering, making use of SWC integration and webpack features to provide effective and scalable solutions for dynamic content creation.
By strategically choosing Vite for client-side code (where bundling is required) and Next.js for SSR-focused projects, we can ensure that our projects have optimal performance, flexibility, and developer experience, while also ensuring scalability and maintainability as they evolve.
Remaining shielded and supported by Vite and Next.js abstraction is beneficial for simplifying configurations and updates, reducing complexities.
Finally, the full source code:
I hope you found our exploration of compilers, bundlers, and tools enlightening and enjoyable. Just as every journey must conclude, so too must ours!
Conclusion
To conclude, the area of JavaScript build tools and bundlers has undergone a significant change, fueled by the need for quicker development cycles, improved performance, and enhanced developer experiences.
I am grateful to all the creators and contributors who have tirelessly worked to make our processes faster and more efficient.
Our strategic methodology at ekino-France capitalizes on the advantages of Vite and Next.js to maximize performance and simplify development workflows.
Just to let you know, there’s another tool in the background that’s currently in its development phase (beta version), known as Turbopack. I’ll be monitoring its progress, and maybe one day, I’ll share my findings with you.
Until our paths meet again, enjoy reading and learning! ♥️
Want to Connect?
You can find me at Ekino: https://github.com/helabenkhalfallah
